
The following configuration should be done within the ActiveControl Windows GUI main Configuration screen (accessible via Tools >> Configuration…).
| # | Activity | Details |
| 3.2.1 | Upgrades Only | If performing Upgrade from previous version of ActiveControl, run program /BTI/TE_RFIX_NULL_FIELDS in the ActiveControl Domain Controller to avoid issues with new NetWeaver libraries delivered since version 6.20. |
| 3.2.2 | Create ActiveControl Administrators | Within the Administrators and Priority Approvers tab, add in the names of any ActiveControl Administrators designated for your organisation. The first user to login to ActiveControl via the Windows GUI will automatically be created as a ActiveControl Administrator. |
| 3.2.3 | Configure Projects | Within the Classification tab, add the Projects that were defined during the Preparation Phase activities. |
| 3.2.4 | Configure Groups | Within the Classification tab, add the Transport Form and Task groups that were defined during the Preparation Phase activities. Reminder: Transport form groups drive the approval process so this should map appropriately to the project/team structure. Task groups are used for grouping and reporting purposes and can be different to the Transport Form group. |
| 3.2.5 | Configure Types | Within the Classification tab, add the Transport Form and Business Task [Types] that were defined during the Preparation Phase activities. Reminder: the Type field is used for grouping and reporting purposes only. Again Business Task [Types] can be different to Transport Form [Types]. |
| 3.2.6 | Configure Custom Fields | Within the Fields tab, add any additional Custom Fields deemed necessary for the Business Task and Transport Form screens within your organisation. |
| 3.2.7 | Confirm Mandatory / Optional Fields | Within the Fields tab, update the Mandatory pane to reflect whether you need the various standard Business Task and Transport Form fields to be mandatory or optional. |
| 3.2.8 | Configure Deployment Statuses | Within the Task Statuses tab, add the Deployment Statuses that were defined during the Preparation Phase activities. |
| 3.2.9 | Create Target Roles | Within the Target Roles and Transport Schedules tab, create Target Roles for each environment in your SAP estate. Depending on your SAP landscape, typical examples of Targets you may want to create include:
|
| 3.2.10 | Create Import Schedules | Within the Target Roles and Transport Schedules tab, create any required schedules for automatically importing transports on your systems. Some examples of Schedules you might set up are:  Please refer to Admin Guide for further information on schedules as required. You must allocate the batch user to each schedule and add them as an ActiveControl administrator so they have the correct roles to allow them to perform the imports. Note: Do not assign the Schedules to any of the Target Systems at this time, this should be done just prior to go-live. |
| 3.2.11 | Configure Target Systems | Within the Targets and Transport Paths tab, create ‘New Targets’ for all system in your SAP landscape. Target systems must be created for every SAP systems (e.g. ECC DEV, TST, PRD plus BW DEV, TST, PRD) that ActiveControl is to manage on your SAP estate. Please refer to the Administration Guide for more details of the settings, however the following is a general example of what you might want to setup at this point. 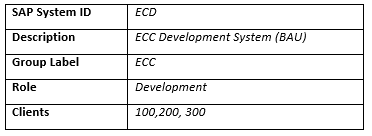 The rest of the Target configuration will be done later in this section. |
| 3.2.12 | Configure Transport Paths | Within the Targets and Transport Paths tab, create ‘New Transport Path…’ for all system in your SAP landscape. Separate transport paths should be created for each SAP module (e.g. ECC, BI, CRM, XI, Portal etc.) and for each landscape tier in your overall SAP estate (e.g. BAU, N+1 etc.) Please refer to the Administration Guide for more details of the Transport Path settings. |
| 3.2.13 | Add Targets to Transport Paths | Within the Targets and Transport Paths tab, add Target Systems to each Transport Path (by highlighting the required path and dragging and dropping into the window). If a target is dragged on top of another target it will follow that target in the transport system sequence. (E.g. QA could be dragged onto top of Development; Production could be dropped on top of QA etc.) |
| 3.2.14 | Switch on Approval Control Points | Within the Targets and Transport Paths tab, switch on the required Inbox, Test Queue and Outbox control points for each target system in the Transport Path. These should be switched on wherever there is a requirement to enforce an approval or test result entry step. Allocate the required deployment statuses to each target system and control point. |
| 3.2.15 | Configure Approvers | Within the Targets and Transport Paths tab, open each Target System and add the required Approvers to each of the Inbox (Pending) Approvers and Outbox Approvers tabs. |
| 3.2.16 | Add Analysis Type Checks | Within the Targets and Transport Paths tab, open each Target System and add the Analysis Checks required for that system in the Analysis Types tab. |
| 3.2.17 | Switch on Caching and other configuration | Within the Other tab: 1. Switch on Caching remote transport data to improve performance. 2. Switch on Require transport forms to be assigned to related tasks to enforce that every transport form must be allocated to the relevant change/ticket. 3. Switch on Configured testers only to complete testing to enforce that only the designated testers are allowed to enter test results. 4. Switch on Enable “Add to Control Point” function to activate this function. The other configuration settings on this tab are entirely dependent on your organisations individual requirements. Refer to the Administration Guide to help you decide whether any of the ‘Other’ configuration options should be enabled. |
Post your comment on this topic.